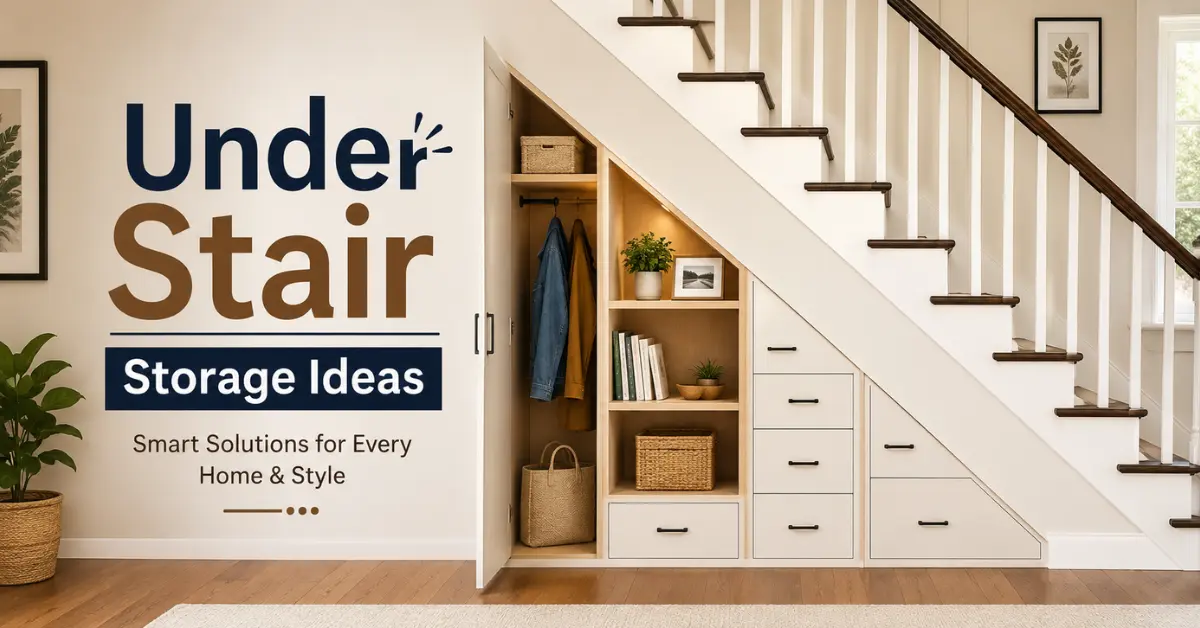
That awkward triangular space under your Under Stair Storage is one of the most consistently wasted areas in a home. Most people either ignore it entirely or stuff it full of random boxes they never touch again. But with a bit of planning, it can become one of the hardest-working storage zones in your house.
Whether you’ve got a small hallway Under Stair Storage or a grand open-plan flight of stairs, this guide covers every practical option — from a $50 weekend fix to a fully custom built-in transformation — along with exactly how to measure your space, what your stair type allows, and the mistakes that waste both money and space.
Before You Do Anything: Measure Your Space Properly
This is the step every Pinterest board skips, and it’s the reason so many Under Stair Storage projects end up with wasted gaps or storage that doesn’t actually fit.
Here’s what to measure before you buy or build anything:
- Total width — measure at the widest point (the back, near the wall)
- Total depth — from the front face of the stairs to the back wall
- Headroom at the tallest point — this is what determines whether you can walk in or only reach in
- Headroom at the shortest point — the low end near the bottom stair, which is often less than 60cm/24 inches
- Number of risers and their depth — relevant if you’re building step drawers
- Any obstructions — pipes, electrical panels, gas meters, structural posts
Write these down before looking at any storage solution. A solution that works for a 2.4m-wide staircase will fail completely for a 1.2m one.
What Type of Stairs Do You Have? It Changes Everything
This is the single most overlooked factor in under-stair planning. Your stair configuration determines what’s actually possible.
- Straight stairs are the most common and give you the most options. The space underneath is a clean triangle — ideal for drawers, a closet, shelving, or a desk nook.
- L-shaped (quarter-turn) stairs have a landing partway up, which breaks the space into two sections beneath. You can often still create good storage in the larger section, but the smaller section near the landing may be too shallow for much beyond a narrow shelf or wine rack.
- U-shaped (half-turn) stairs have two landings, which creates multiple disconnected pockets of space beneath. These are trickier to work with, but the individual sections can each serve a specific purpose.
- Open-riser stairs — the trendy floating-step style — have no enclosed space underneath at all. Your options here are limited to the area beside or below the staircase structure, and you may need to add framing before creating any storage.
- Closed-riser stairs with a solid wall on one or more sides are the easiest to convert into proper enclosed storage, since the structure is already partly in place.
10 Under Stair Storage Ideas (From Simple to Custom)
1. Floating Shelves Along the Side Wall
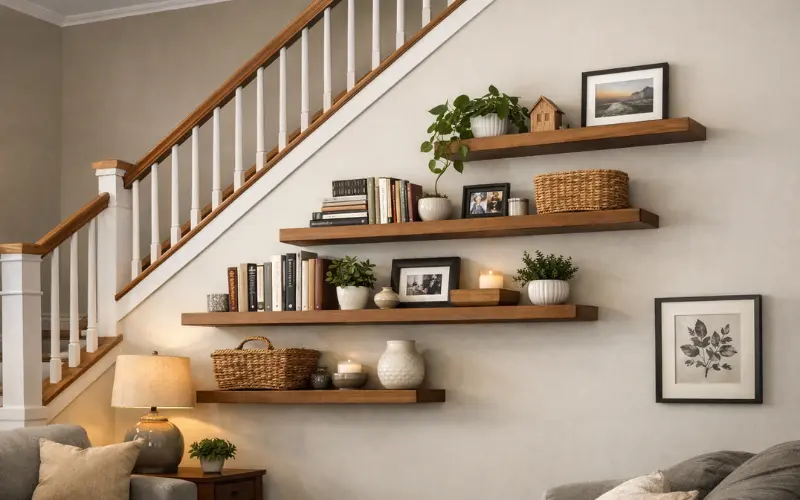
If your stairs run along a wall, fitting floating shelves to that wall is the easiest and cheapest place to start. Use them for books, plants, framed photos, or decorative baskets. This works especially well in living rooms where the staircase is visible — it makes the space look intentional rather than wasted.
Cost: $50–$200 depending on shelf size and material.
2. Wicker or Rattan Baskets
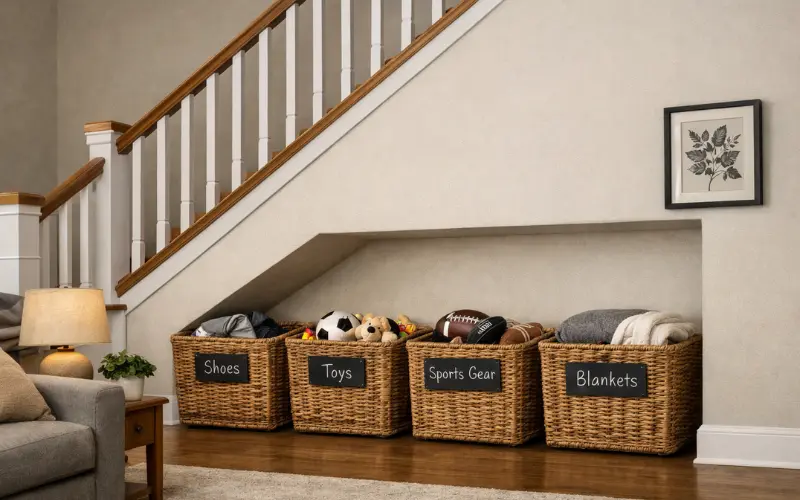
Don’t underestimate the basket. If you have open space under your stairs and just need a quick fix, a row of large wicker baskets can hold shoes, sports gear, kids’ toys, or blankets. They’re renter-friendly, require zero installation, and look far better than a pile of random bags.
Label them clearly so the system actually works long-term.
Cost: $30–$120 for a matching set.
3. Freestanding Shelving Unit

A freestanding shelving unit — like the IKEA KALLAX or a wire shelf rack — can slot neatly into the taller section of the under-stair space. It requires no drilling, no carpentry, and can be moved if you redecorate. Pair it with matching baskets or boxes to keep things looking organised.
The limitation: freestanding units are rectangular, and the under-stair space is triangular. You’ll lose the sloped section unless you’re strategic about what you store there.
Cost: $80–$300.
4. Custom Pull-Out Drawers
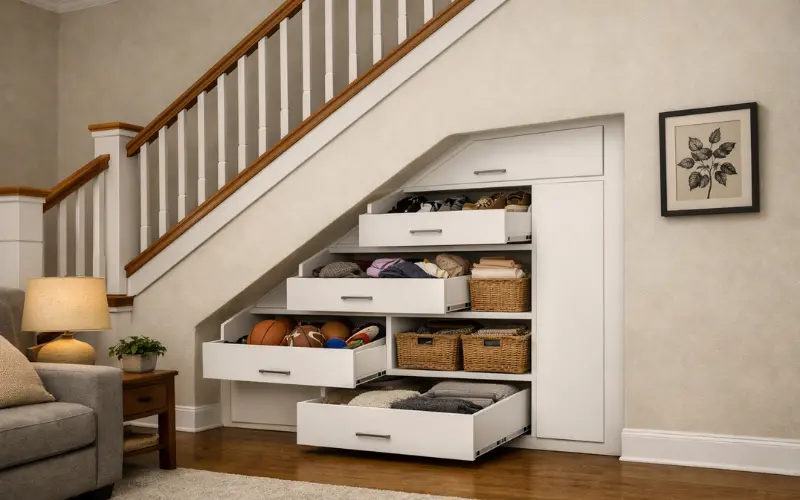
This is the most practical built-in option for straight stairs with a closed wall. Drawers built to match the slope of each step — so each drawer is a different size — make use of virtually every centimetre of the space. You access them from the front, and from the outside they look like part of the wall.
Pull-out drawers are ideal for shoes, seasonal items, kids’ gear, or anything you need to access regularly without digging through a pile.
One real-world note: the drawer runners for full-depth timber drawers are genuinely expensive — heavy-duty soft-close runners can run $100–$140 each, which adds up fast on a full set. Budget for this upfront.
DIY cost: $400–$1,200 depending on materials and number of drawers.
Carpenter-installed: $2,000–$5,000+.
5. Built-In Enclosed Cupboard With Door
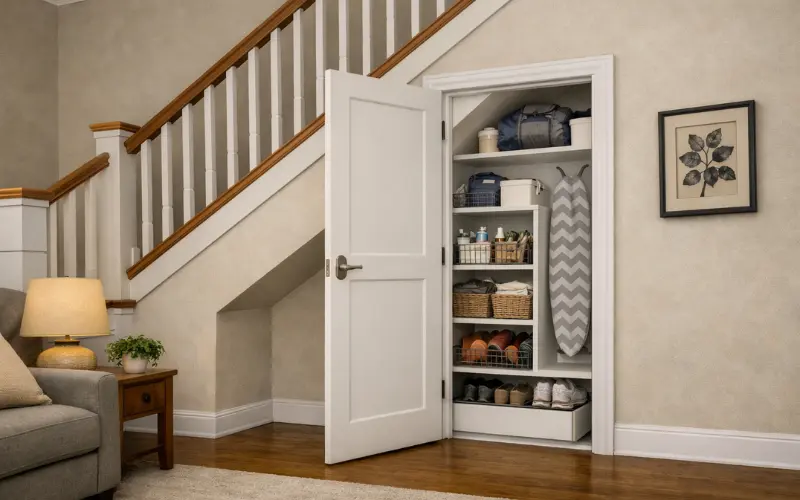
The classic option — enclose the space with a door (or two or three) and you’ve got a dedicated storage room. It’s great for vacuum cleaners, ironing boards, sports equipment, and anything bulky you want out of sight.
A single-door version with basic shelving inside is the most affordable built-in option. Adding internal organisation like pull-out baskets, hooks, or a shoe rack makes it far more functional.
Important: If you enclose the space, most building codes require the internal surfaces to be lined with drywall (typically 12.7mm/½ inch gypsum board minimum for residential). This is a fire safety requirement, not optional. Check your local council or building authority before starting.
Cost: $500–$2,000 for a basic enclosed cupboard, depending on size and finishes.
6. Coat and Shoe Mudroom Zone
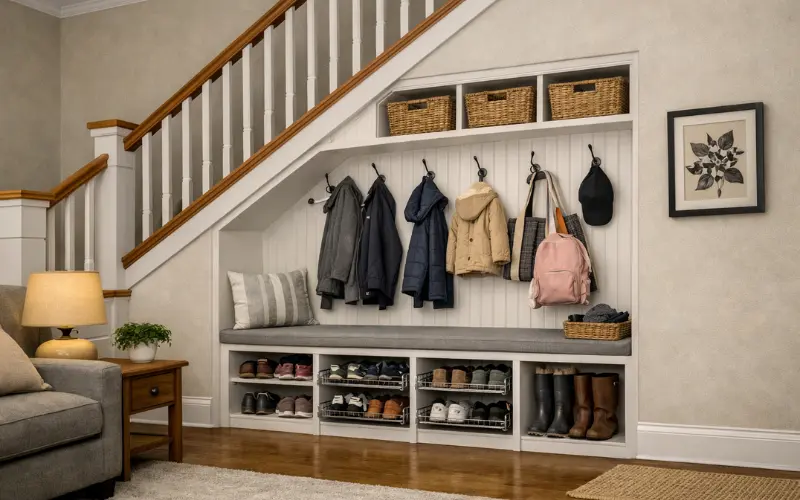
If your staircase is near the front door or back entry, this is the most functional conversion you can make. Install a bench for sitting while putting on shoes, hooks at multiple heights for coats and bags, and either cubbies or pull-out racks for shoes underneath.
This works especially well for families with kids — it creates a landing zone so bags and coats don’t end up on the floor.
For a budget version: a freestanding hall bench with storage, a mounted hook rail, and a shoe rack can achieve 80% of the result for a fraction of the cost.
Budget version: $150–$400.
Built-in version: $1,500–$4,000.
7. Home Office Nook
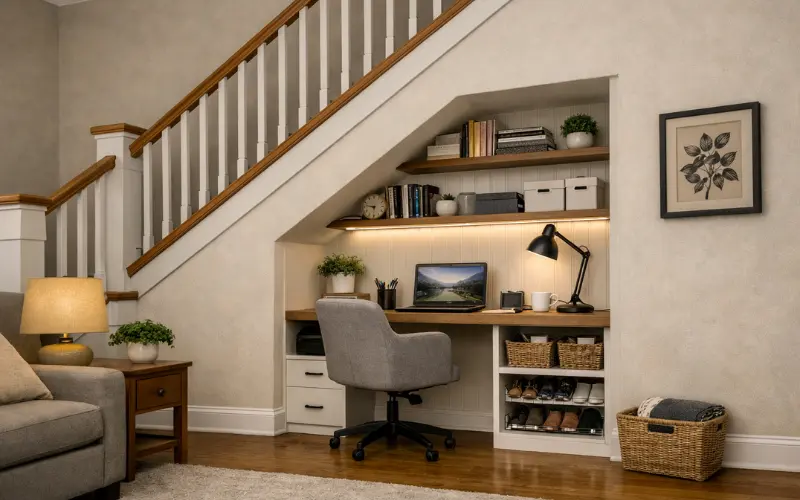
If you need a dedicated workspace and you’re short on room, the under-stair space can hold a compact desk setup surprisingly well. The tallest section of the space (near the top of the staircase) is usually 1.8–2.1m high, which is enough to work comfortably standing or seated at a desk.
You’ll need:
- A desk surface (built-in or a simple shelf at the right height)
- Power outlets (get an electrician to add one if there isn’t one already)
- Good lighting — this area is dark, so an LED strip or desk lamp is essential
- Cable management if you’re running a computer setup
Close it off with a curtain or a door when you’re not using it and it disappears completely.
Cost: $200–$800 for a basic setup; $1,500–$3,500 for a custom built-in desk nook.
8. Wine Storage
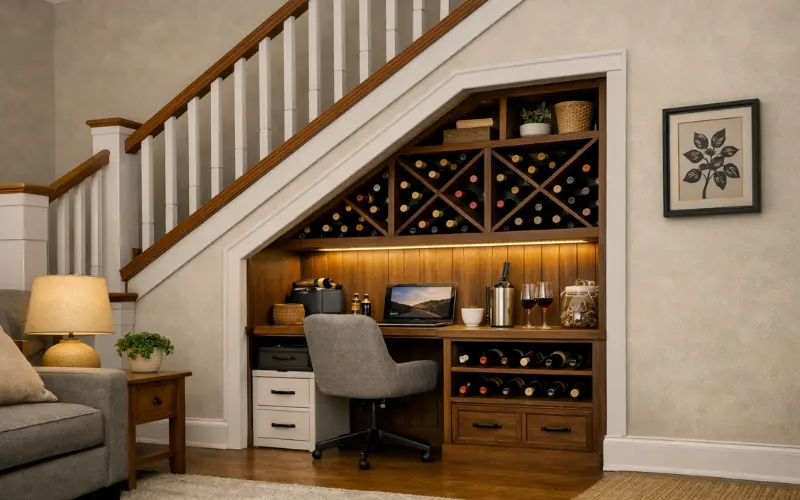
The triangular space Under Stair Storage happens to be ideal for wine — it’s cool, dark, and away from direct light. You can install a simple wooden wine rack, a modular metal rack system, or go all the way to a custom wine cellar with a glass door.
Even a basic DIY wine rack using wooden dowels and a simple frame can hold 20–30 bottles and look incredibly intentional for minimal cost.
Cost: $60–$300 for a DIY or freestanding rack; $2,000–$8,000+ for a bespoke climate-controlled wine cellar.
9. Reading Nook or Kids’ Play Nook
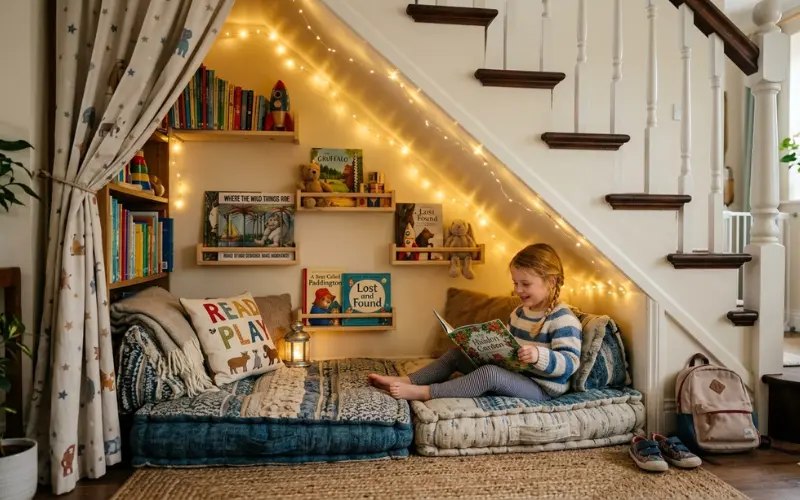
With some cushioning on the floor, a string of fairy lights, and a few shelves for books, the under-stair space can become a cosy reading nook or a child’s favourite hiding spot. It’s one of the most charming uses of the space — and one of the cheapest.
For adults: a built-in bench seat with storage underneath, good lighting, and a small bookshelf make it a genuine retreat.
For kids: keep it simple. A floor cushion, some low shelves for toys and books, and maybe a curtain or half-door is all you need. Kids love the enclosed, cave-like feel of it.
Cost: $100–$600.
10. Pantry or Kitchen Overflow Storage

If your Under Stair Storage is near the kitchen — or you’re in an open-plan home where the stairs run adjacent to the kitchen — converting the space into pantry storage is incredibly practical. Deep shelves can hold bulk dry goods, small appliances, cleaning supplies, or anything that’s cluttering your kitchen cupboards.
Use shelf risers and clear containers so things don’t get buried at the back. Label everything — the sloped ceiling makes it easy to lose track of what’s stored where.
Cost: $300–$1,500 depending on whether shelving is freestanding or built-in.
DIY vs. Hiring a Professional: How to Decide
Not every Under Stair Storage project needs a carpenter. Here’s a straightforward way to think about it:
Do it yourself if:
- You’re installing freestanding furniture, baskets, or off-the-shelf shelving
- You’re comfortable with basic tools and can follow a build plan
- Your space doesn’t need any structural changes
- Your budget is under $500
Hire a professional if:
- You want pull-out drawers, built-in cabinetry, or custom joinery
- You need electrical work (adding power points or lighting)
- The space has structural elements (posts, beams) that need to be assessed
- You want the finish to match the rest of your home’s millwork
- You’re planning to enclose the space and need to comply with fire safety regulations
A basic enclosed cupboard from a carpenter typically runs $1,500–$3,000. A full custom pull-out drawer system can range from $3,000 to $7,000+. Get at least two quotes and ask to see examples of previous Under Stair Storage work specifically — it’s a specialist job that not every handyman has done before.
How to Light the Under-Stair Space
Every single competitor article misses this, which is strange because it’s one of the most practical things you can do. Under Stair Storage are almost always dark, which makes them annoying to use and easy to forget about.
Here are the best lighting options:
- LED strip lights — run along the inside top edge of an enclosed cupboard, these are cheap, low-profile, and can be motion-activated. Ideal for pantry or mudroom storage.
- Puck lights — battery-powered stick-on lights that require no wiring. A good choice for renters or anyone who doesn’t want to involve an electrician.
- Motion sensor downlights — if you’re getting an electrician in for an outlet anyway, add a small downlight on a motion sensor above the entry point of the storage area. It turns on when you open the door.
- Rechargeable LED lamps — a USB-rechargeable lamp with a motion sensor mounted to the wall is a cheap, cable-free solution that works well in enclosed cupboards.
Whatever you choose, don’t skip the lighting. A well-lit storage space actually gets used. A dark one becomes a black hole.
Building Code and Permit Considerations
This is the section nobody wants to write, but you genuinely need to know it before you enclose any under-stair space.
- Fire safety lining: In most residential building codes (including Australia, the UK, and the US), any enclosed usable space under a staircase must be lined with fire-resistant material — typically 12.7mm (½ inch) gypsum board/plasterboard on all interior surfaces. This is not a suggestion. It’s a minimum fire protection requirement.
- Permits: Whether you need a building permit depends on your local council or authority. In Australia, minor non-structural works are often exempt, but adding electrical, plumbing, or structural changes will typically require approval. In the UK, most under-stair conversions fall under permitted development, but it’s worth checking with your local planning authority. Always confirm before you build.
- Electrical work: Adding power points or hardwired lighting under the stairs must be done by a licensed electrician in Australia, the UK, and most US states. This is non-negotiable — don’t DIY electrical work in an enclosed space.
- Existing utilities: Check before you close anything off. Gas meters, electrical consumer units, water shut-offs, and network junction boxes are sometimes located Under Stair Storage. These must remain accessible at all times — you can’t legally enclose them behind a fixed wall without an access panel.
If in doubt, ask your local building authority before starting. A quick call can save you thousands in remediation later.
Common Mistakes to Avoid
- Not accounting for the slope. Rectangular furniture doesn’t fit a triangular space. Either buy specifically for the under-stair shape or build to fit — otherwise you waste the most interesting part of the space.
- Choosing doors that swing outward into a narrow hallway. In tight corridors, a hinged door that opens outward can block the entire hallway. Consider sliding doors, bi-fold doors, or curtains instead.
- Ignoring ventilation in an enclosed cupboard. If you’re storing shoes, cleaning supplies, or damp sporting gear in an enclosed space, it will smell — fast. A simple louvred panel or a small passive vent in the door makes a big difference.
- Not planning for access to utilities. If there’s a meter, junction box, or water valve under your stairs, design your storage around it with an access panel — don’t box it in.
- Buying before measuring. The most common mistake of all. Take your measurements first, then shop.
- Underestimating the drawer runner cost. If you’re planning pull-out drawers from solid timber, the runners alone can add several hundred dollars to your project. Budget for them specifically.
- Forgetting lighting. A dark storage space becomes a dumping ground. Light it properly and it stays organised.
Under Stair Storage by Budget
Under $200 — The Quick Win
Wicker baskets, a freestanding shelf unit, floating shelves on the adjacent wall, or a combination of hooks and a shoe rack. No installation, no permits, immediate results.
$200–$800 — The Weekend Project
A DIY enclosed cupboard with a pre-hung door, a modular shelving system sized to your space, a custom wine rack, or a reading nook with a built-in bench. Requires basic DIY skills and tools.
$1,000–$3,000 — The Carpenter Job
A properly enclosed cupboard with carpentry-grade doors and internal fittings, a basic pull-out drawer system, or a built-in mudroom zone. This is the range where hiring a skilled tradesperson makes the most sense.
$3,000–$10,000 — The Full Custom Build
Fully custom pull-out drawers matched to each stair rise, integrated lighting, a home office nook with bespoke joinery, or a climate-controlled wine cellar. This is the “do it once, do it properly” end of the spectrum — and it adds genuine value to your home.
FAQs
Do I need council approval to add Under Stair Storage under my stairs?
For simple freestanding or open shelving, no. For enclosed built-in storage, especially anything involving electrical work or structural changes, check with your local council first. Requirements vary by location and the scope of the project.
Can I store anything under my stairs?
Most things, yes. Avoid storing flammable materials (petrol, paint thinners) in an enclosed under-stair space, as this is both a fire risk and typically prohibited by building codes. Items that generate moisture — like wet sports gear — should have ventilation nearby.
How do I stop an Under Stair Storage cupboard from smelling musty?
Ventilation is key. Add louvres or a passive vent to the door, avoid storing wet items, and consider a moisture absorber (like a DampRid pack) inside the space if your home is in a humid climate.
Is it worth getting custom pull-out drawers built?
If you have a family and use the space daily, yes — custom drawers make the space far more functional than a basic cupboard. If you’re on a tight budget or likely to move house, a good off-the-shelf solution is more practical.
What’s the best use of under-stair space in a small home?
Shoe and coat storage near the entry, or pantry overflow near the kitchen. These are the two uses that make the biggest everyday difference in a small home.
Can I add electricity under my stairs?
Yes, but it must be done by a licensed electrician. A single power point and a light make the space dramatically more functional.
How deep is Under Stair Storage typically?
The depth (front to back) varies depending on your staircase position, but most domestic stairs allow 60–120cm of usable depth at the widest point. Measure yours — don’t assume.
What’s the cheapest way to use the Under Stair Storage space?
Wicker baskets or a freestanding shelf unit. Both can be done for under $150 and require no installation or permits.
Can a renter use their under-stair space?
Yes, using freestanding furniture, baskets, and removable hooks. Avoid anything that requires drilling into walls or structural changes without your landlord’s permission.
Does under-stair storage add home value?
A well-executed built-in under-stair solution — particularly custom drawers, a neat cupboard, or a wine storage area — is a genuine selling point. It signals that storage has been thoughtfully designed into the home
Final Thoughts
The space under your stairs is far more valuable than most homeowners realize. Whether you choose a simple row of baskets, a practical coat-and-shoe station, a hidden pantry, or a fully custom drawer system, the right solution can transform an awkward unused corner into one of the most functional areas in your home.
The key is to start with accurate measurements, understand the limitations of your staircase design, and choose a storage solution that matches both your needs and budget. Small improvements can make a noticeable difference, while larger custom projects can dramatically increase organization, convenience, and even the overall appeal of your property.
Most importantly, focus on how you actually live. The best under-stair storage isn’t the most expensive option—it’s the one that solves everyday clutter, keeps essential items accessible, and makes your home feel more organized. With thoughtful planning, that forgotten triangular space can become a hardworking feature you’ll use every single day.