If your pantry is a chaotic mess of tumbling cans and half-forgotten spice jars, you are not alone. Most builder-grade pantries come with basic wire shelving that looks cheap and wastes space. The good news? You can build custom DIY pantry shelves in a single weekend — no contractor required — and transform that neglected closet into one of the most functional spaces in your home.
This guide covers everything your competitors miss: exact shelf spacing for different food categories, load capacity tips, how to choose the right material for your budget, and common beginner mistakes to avoid. Whether you are working with a small closet pantry or a large walk-in, these steps work for every size.
Why Build DIY Pantry Shelves Instead of Buying Them?
Before diving into the how-to, it is worth knowing why custom DIY pantry shelves beat store-bought options every time.
- Custom fit: Every pantry is a different size. DIY pantry shelves fit your exact dimensions instead of forcing you to work around standard sizes.
- Lower cost: A full set of custom-built pantry shelves typically costs between $50 and $200 in materials — a fraction of professional installation.
- Better storage: You control the shelf heights, so you can design spaces around your actual food items — tall bottles, cereal boxes, small spice jars, and everything in between.
- More beautiful: Custom shelves with trim pieces, caulked edges, and fresh paint look far more polished than wire shelving or flat-pack units.
What You Need Before You Start
Choosing Your Shelf Material
This is one of the most important decisions and something most guides gloss over. Here is a quick breakdown:
- MDF (Medium-Density Fiberboard) Best for painted shelves. MDF is smooth, affordable, and finishes beautifully. It does not handle moisture well, so avoid it if your pantry has any humidity issues. It must be painted — it cannot be stained.
- Plywood (3/4 inch) Stronger than MDF and handles moisture better. Great for heavier loads like canned goods. It can be painted or stained. Slightly more expensive than MDF.
- 2×4 Lumber The most budget-friendly option. A full set of 2×4-based DIY pantry shelves can cost under $50. Sturdy and beginner-friendly, though it requires more cuts and assembly time.
- Pine Boards Great for a natural wood look. Easy to work with and takes stain beautifully. Use pine for shelf faces and trim to give any build a more finished, furniture-like appearance.
Full Materials List
- 3/4-inch MDF or plywood sheets (for shelf surfaces)
- 2×2 or 1×2 pine boards (for shelf cleats and support pieces)
- 1×3 pine boards (for shelf face trim)
- Stud finder
- Level (both a small torpedo level and a long 4-foot level)
- Drill and drill bits
- Miter saw or circular saw
- Nail gun and finish nails (or a hammer and nails)
- Pocket hole jig and screws (optional but very helpful)
- Wood glue
- Liquid Nails construction adhesive
- Clamps
- Sandpaper (100 and 150 grit)
- Spackling paste or wood filler
- Caulk and caulk gun
- Primer
- Paint of your choice
- Tape measure and pencil
Estimated Cost by Approach
| Build Type | Estimated Cost |
|---|---|
| 2×4 freestanding shelves | $30 – $60 |
| MDF wall-mounted shelves | $80 – $150 |
| Plywood built-in shelves | $150 – $250 |
| IKEA cabinet hybrid | $200 – $400 |
How to Plan Your DIY Pantry Shelves (Do This First!)
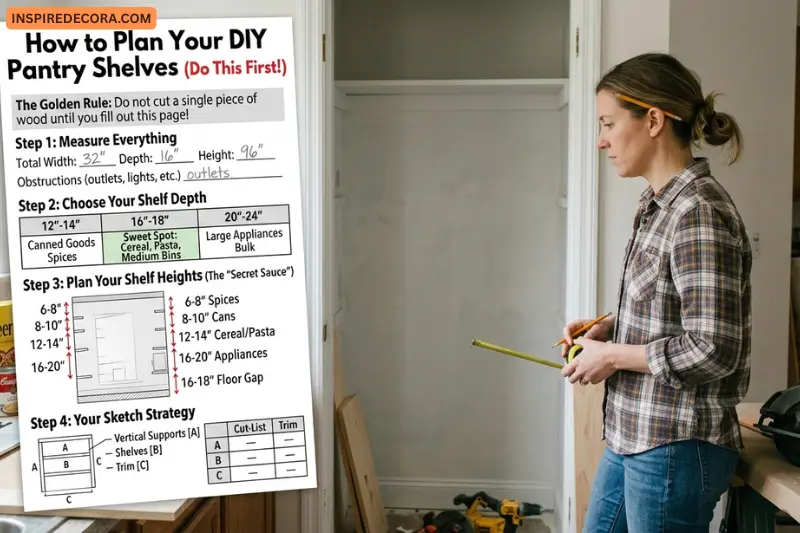
Most DIYers jump straight to cutting wood. Skipping the planning stage is the number one mistake — and it leads to shelves that are either too shallow, too tall, or spaced in ways that waste space.
Step 1: Measure Everything
Measure the width, depth, and height of your pantry. Write down all three. Also note the location of any outlets, light fixtures, or vents.
Step 2: Decide on Shelf Depth
Here is what most guides do not tell you: shelf depth depends on what you are storing.
- 12 to 14 inches deep: Ideal for canned goods, jars, and spices
- 16 to 18 inches deep: Works for cereal boxes, pasta, and medium containers
- 20 to 24 inches deep: Best for large appliances, bulk items, and big bins
A 16-inch depth is a safe all-around choice for most pantries.
Step 3: Plan Your Shelf Heights (This Is Critical)
This is the piece of information almost no DIY guide provides, and it makes a huge difference in how usable your pantry actually is.
- Spices and small jars: 6 to 8 inches between shelves
- Canned goods and condiments: 8 to 10 inches between shelves
- Cereal boxes, pasta boxes, and tall bottles: 12 to 14 inches between shelves
- Appliances, pitchers, and bulk containers: 16 to 20 inches between shelves
- Bottom shelf (floor to shelf): 16 to 18 inches to accommodate large bags or a small cooler
Bring your actual pantry items into the space and measure them before finalizing your plan. This 10-minute step will save you enormous frustration later.
Step 4: Sketch Your Design
You do not need to be an artist. A simple hand-drawn sketch with measurements labeled is enough. Assign each piece of wood a letter (A, B, C) so you can map out exactly how many sheets of MDF or plywood you need before going to the hardware store.
Step-by-Step: How to Build DIY Pantry Shelves
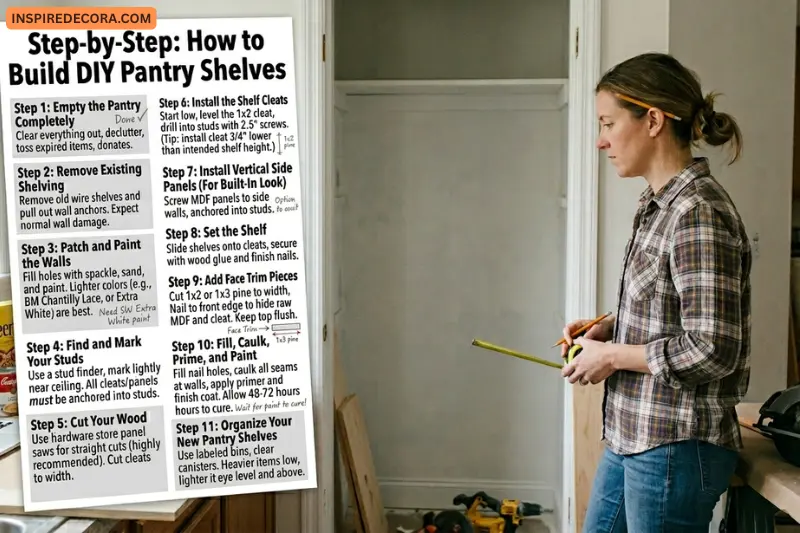
Step 1: Empty the Pantry Completely
Clear everything out. This is also a great time to declutter — toss expired items and donate duplicates before rebuilding.
Step 2: Remove Existing Shelving
Most pantries have wire shelves held in by wall anchors. Remove the shelves first, then use a wrench or pliers to pull out the anchors. Expect some wall damage — this is normal. You will fix it in the next step.
Step 3: Patch and Paint the Walls
Fill all holes with spackling paste. Let it dry completely, sand smooth, and then paint the entire interior of the pantry before installing anything. Painting an empty pantry is infinitely easier than painting around shelves later.
Lighter colors like white or soft off-white make your pantry feel brighter and larger. Popular choices include Benjamin Moore Chantilly Lace or Sherwin-Williams Extra White.
Step 4: Find and Mark Your Studs
Use a stud finder to locate every stud in your pantry walls. Mark them lightly in pencil near the ceiling so they stay visible throughout the build. All cleats and vertical panels must be anchored into studs — never rely on drywall anchors alone for heavy shelving.
Step 5: Cut Your Wood
If you are working with MDF or plywood sheets, most hardware stores will make straight cuts for free or a small fee. This is highly recommended — their panel saw is far more accurate than cutting full sheets at home, and it makes transporting the materials much easier.
Cut your shelf cleats (the support pieces that the shelves rest on) from 1×2 pine. Each cleat should be cut to the full width of the shelf it will support.
Step 6: Install the Shelf Cleats
Starting with the lowest shelf, hold your cleat against the wall at your planned height. Use your level to confirm it is perfectly level, then drill it into the studs using 2.5-inch screws. Repeat for every shelf, working your way up the wall.
A helpful tip: install the cleat at a height that is 3/4-inch lower than your intended shelf height. The shelf panel itself (3/4-inch thick) will sit on top, bringing the surface to exactly the right height.
Step 7: Install Vertical Side Panels (For Built-In Look)
If you want your pantry shelves to look truly built-in, install vertical MDF panels against each side wall first. Screw these directly into the studs. These panels give the shelves something solid to nest against and make the whole installation feel custom-made.
Step 8: Set the Shelf Panels in Place
Slide each cut shelf panel onto its cleats. Once it sits level, secure it with a few finish nails or short screws through the shelf top and into the cleat below. Wood glue on the cleat before laying the shelf adds extra holding strength.
Step 9: Add Face Trim Pieces
This is the step that separates a beautiful DIY result from an amateur-looking one. Cut 1×2 or 1×3 pine boards to the width of each shelf and nail them to the front edge. These face pieces accomplish three things at once:
- They hide the raw cut edge of the MDF or plywood
- They conceal the cleat underneath
- They make the shelf look thicker and more solid
Use wood glue plus a few finish nails to secure each face piece. Keep the top of the face piece flush with the top surface of the shelf.
Step 10: Fill, Caulk, Prime, and Paint
Once the structure is complete, fill all nail holes with wood filler. Apply caulk wherever the shelves and panels meet the wall — this seam makes everything look seamless and professional. Let it all dry fully, apply one coat of primer, and then finish with two coats of paint in your chosen color.
Allow the paint to cure for at least 48 to 72 hours before loading the shelves with heavy items.
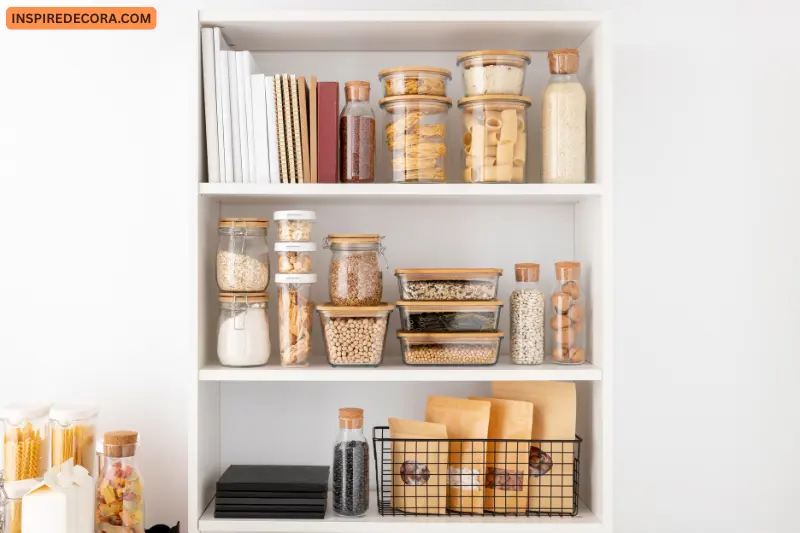
Step 11: Organize Your New Pantry Shelves
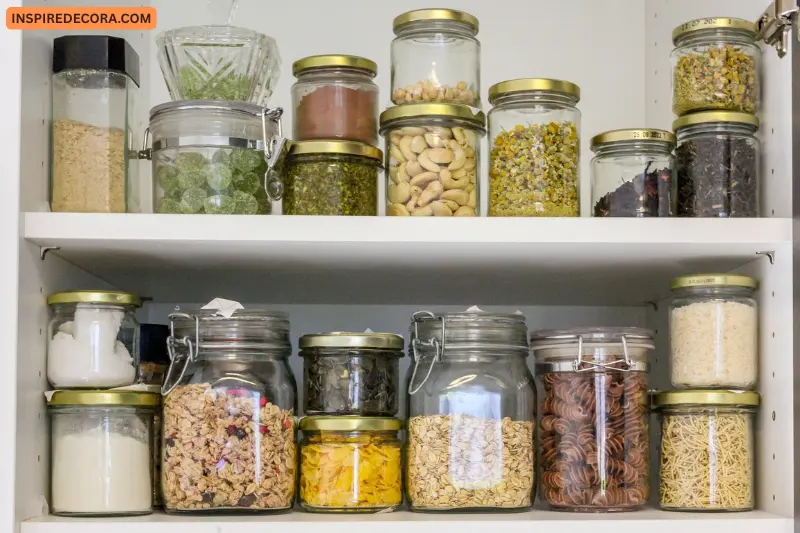
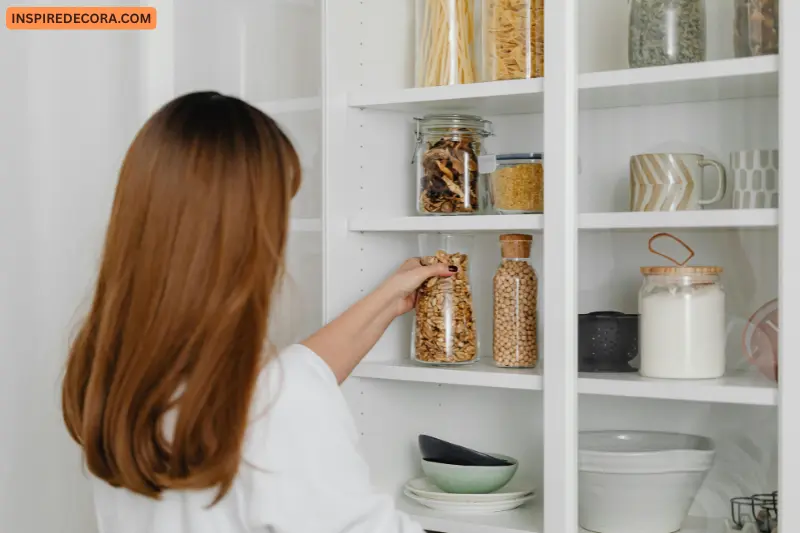
Now the fun part. Use labeled bins, clear canisters, and baskets to group similar items. Place heavier items (canned goods, appliances) on lower shelves, and lighter items (snacks, cereal, spices) at eye level and above.
DIY Pantry Shelf Ideas for Every Pantry Type
Small Closet Pantry
Work vertically. Add as many shelves as the height allows, using the spacing guide above. Install a shallow shelf at the very top for rarely used items, and consider adding a door organizer for spices and small packets.
Walk-In Pantry
Plan shelves on at least two or three walls. Use one wall for taller items and one for shorter ones. Add a middle island or countertop section (at standard 36-inch height) if space allows — it creates a prep and staging area inside the pantry.
IKEA Hybrid Approach
If you want the look of custom built-ins without building from scratch, use two IKEA base cabinets (such as the 18x14x90 SEKTION units) as your anchor pieces. Build floating shelves above them using the cleat method. Add a butcher block or laminate countertop across the cabinets to create a functional surface. This method gives you closed storage at the bottom and open shelves above.
Open Wall Pantry (No Closet)
If you do not have a dedicated pantry closet, you can create DIY pantry shelves on any open wall. Frame the area with vertical panels on each side to define the space visually, then build shelves between them. A curtain rod with a simple curtain can provide a door-free way to keep everything hidden when not in use.
Common Mistakes to Avoid
- Not anchoring into studs. Pantry shelves carry significant weight. Drywall anchors alone will eventually pull out. Always locate studs and screw into them.
- Skipping the level. Even a slight tilt looks terrible and causes items to slide. Check every single cleat with a level before drilling.
- Making all shelves the same height. This wastes more space than almost any other mistake. Follow the shelf spacing guide above and match heights to your actual items.
- Forgetting to cure the paint. Paint may feel dry to the touch within hours, but it takes 48 to 72 hours to fully cure. Loading heavy canned goods onto freshly painted shelves will cause scuffs and damage.
- Not measuring twice. A wrong cut wastes both wood and money. Measure twice, cut once — it is a cliché because it is true.
How Much Weight Can DIY Pantry Shelves Hold?
This depends on three things: the material, the shelf span, and how well it is anchored.
- A 3/4-inch plywood shelf spanning 24 inches, supported on both ends and anchored into studs, can hold 50 to 80 pounds.
- A 3/4-inch MDF shelf of the same span handles slightly less — around 40 to 60 pounds — because MDF is more prone to sagging under sustained weight.
- For spans wider than 36 inches, add a center support cleat or a vertical panel beneath the shelf to prevent sagging over time.
As a general rule, keep canned goods and heavy items on shorter-span shelves and spread the weight across multiple shelves rather than loading one shelf heavily.
Finishing Touches That Make a Big Difference
- Under-shelf lighting: Stick-on LED strips or battery-powered puck lights transform a dim pantry into a space you actually enjoy using.
- Wallpaper or a bold paint color on the back wall: Even a simple pattern on the back wall adds personality and makes the pantry feel designed rather than functional.
- Labeled bins and baskets: Clear bins or labeled baskets keep things organized long after the build is done.
- A chalkboard label strip: Paint a strip of chalkboard paint on the front of each shelf edge so you can write the category in chalk.
- A pull-out drawer for snacks or small items: If you have a deeper lower section, a simple wooden tray on drawer slides creates a pull-out that maximizes storage depth.
Frequently Asked Questions About DIY Pantry Shelves
How deep should pantry shelves be?
Most pantry shelves work best at 16 to 20 inches deep. Shallower shelves (12 inches) are great for spices and cans; deeper shelves (20+ inches) suit appliances and bulk goods. Avoid going deeper than 24 inches unless you have a very large walk-in pantry — deep shelves cause items to get lost in the back.
What is the best material for DIY pantry shelves?
For a painted finish, 3/4-inch MDF is the smoothest and most affordable option. For a stained wood look or if you need maximum strength, use 3/4-inch plywood. If you are on a very tight budget, 2×4 lumber shelves work well and cost under $60 for a full pantry.
How do I make pantry shelves stronger?
Always anchor cleats into wall studs using 2.5-inch or 3-inch screws. For wide shelves (over 36 inches), add a center support cleat. Using wood glue in addition to nails or screws significantly increases the strength of every joint.
Can I build DIY pantry shelves without power tools?
Yes, though it takes longer. A hand saw can replace a miter saw or circular saw. A hammer and nails can replace a nail gun. A hand drill is the one tool that is genuinely hard to replace — it is worth borrowing one if you do not own it.
How long does it take to build pantry shelves?
For a standard closet pantry, expect 6 to 10 hours spread over a weekend: a few hours for prep and cutting on day one, and the rest for assembly, caulking, and painting on day two. Add drying and curing time before organizing.
Do I need to remove baseboards before building pantry shelves?
If you want shelves and vertical panels to sit flush against the wall, yes — you will need to remove the baseboards first. Save them and reinstall them around the shelves afterward, or cut them to fit the new configuration.
How much space should I leave between pantry shelves?
It depends on what you are storing. A good starting point: 6 to 8 inches for spices, 10 to 12 inches for cans and jars, 14 to 16 inches for boxes, and 18 to 20 inches for appliances and large containers. Always measure your actual items before finalizing shelf heights.
Is it cheaper to build or buy pantry shelves?
Building is almost always cheaper. Custom-built DIY pantry shelves cost $50 to $250 depending on materials. Comparable custom-made shelves from a carpenter or cabinetmaker can cost $500 to $2,000 or more for the same space.
Final Thoughts
Building DIY pantry shelves is one of the most rewarding home improvement projects you can take on. The skills are learnable, the tools are accessible, and the results are genuinely beautiful. More importantly, a well-organized pantry reduces daily stress — you stop losing things, stop buying duplicates, and start actually enjoying your kitchen.
Start with a plan, choose your materials based on your budget and finish preference, anchor everything properly into studs, and take the time to caulk and paint for a truly polished result. Your future self — standing in a tidy, organized pantry — will be very glad you did.