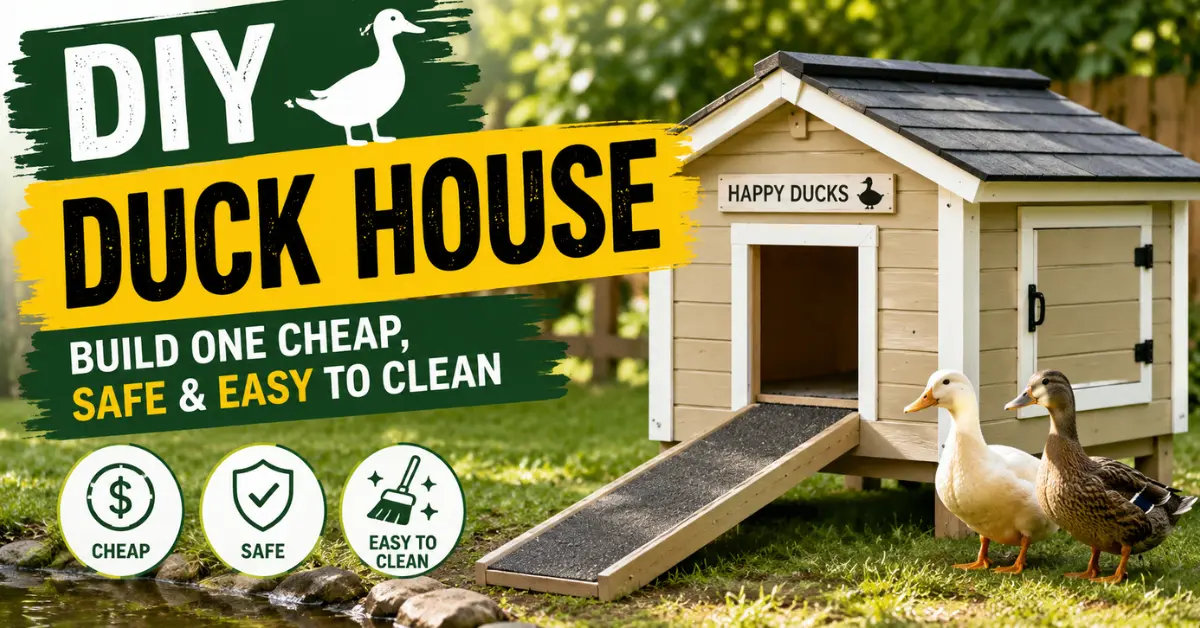
Building a DIY duck house is one of the best decisions you can make for your backyard flock. Store-bought coops rarely meet the specific needs of ducks, and most are overpriced for what you get. A well-planned DIY duck house gives you full control over size, layout, ventilation, and cleaning access — and you can build one for as little as $40 using reclaimed materials.
This guide walks you through everything: sizing, materials, step-by-step construction, predator-proofing, flooring, bedding, and the mistakes most first-timers make with their duck house DIY project.
Why Ducks Need Their Own House
Before you build, it helps to understand what makes a DIY duck house different from a standard chicken coop. Ducks sleep on the ground — they don’t roost. They produce far more moisture than chickens through droppings and constant water play. They don’t use nest boxes. And they need a low or ground-level entry door, not a stepped pop hole designed for chickens.
A DIY duck house that ignores these needs will be wet, smelly, and ineffective within weeks. One that’s built around how ducks actually live will stay clean, dry, and safe for years.
How Big Should Your DIY Duck House Be?
Sizing is the most important decision in any DIY duck house build. The minimum is 4 square feet of floor space per duck — but minimum and comfortable are two different things.
| Number of Ducks | Minimum Size | Recommended Size |
|---|---|---|
| 2 ducks | 8 sq ft | 3 ft x 4 ft |
| 4 ducks | 16 sq ft | 4 ft x 5 ft |
| 6 ducks | 24 sq ft | 5 ft x 6 ft |
| 8 ducks | 32 sq ft | 5 ft x 8 ft |
Interior height should be at least 3 feet so you can reach inside to clean. A 4-foot interior height makes your duck house far more practical to maintain long-term.
Materials You Need for a DIY Duck House
Here’s what a standard 4-duck DIY duck house build requires:
Framing and walls:
- 2×4 lumber — 8 to 10 lengths at 8 ft
- 1/2-inch plywood or OSB — 2 sheets for walls and floor
Roofing:
- Corrugated metal or polycarbonate panels — 1 to 2 sheets
- Roofing screws with rubber washers
Hardware and predator-proofing:
- 1/2-inch welded hardware cloth — 25 ft roll minimum
- Heavy-duty galvanized hinges — 4 to 6
- Raccoon-proof slide bolt latches — 2 per door
Flooring:
- Peel-and-stick vinyl floor tiles — 1 box (covers 20 sq ft)
Cost estimate:
- Reclaimed/pallet build: $20 – $50
- New lumber build: $100 – $200
- Premium build with auto door: $300 – $500
How to Build a DIY Duck House: Step by Step
Step 1: Plan Your DIY Duck House Layout
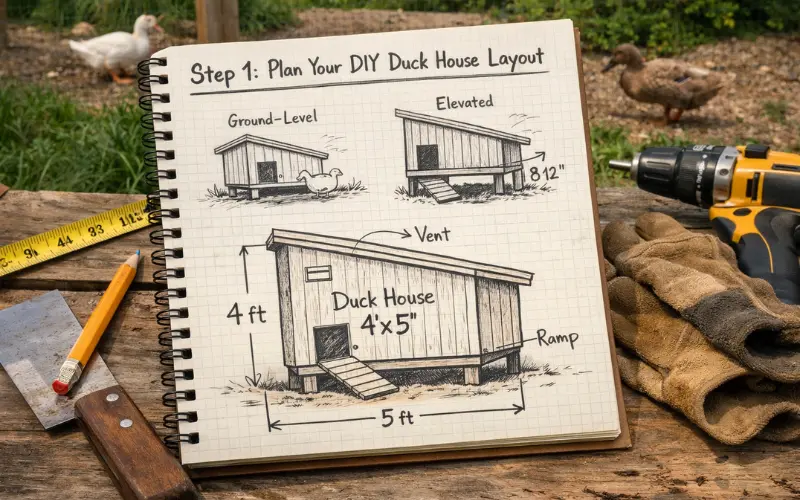
Sketch your DIY duck house footprint before cutting a single board. Decide whether it will be ground-level or elevated. Elevated builds (8 to 12 inches off the ground) improve airflow underneath, reduce moisture absorption, and deter rodents from nesting below. Ground-level builds are simpler and easier for ducks to enter.
Mark out your dimensions. For a 4-duck duck house, a 4×5 ft footprint with a shed-style single-pitch roof is the simplest and most effective design.
Step 2: Build the Floor Frame
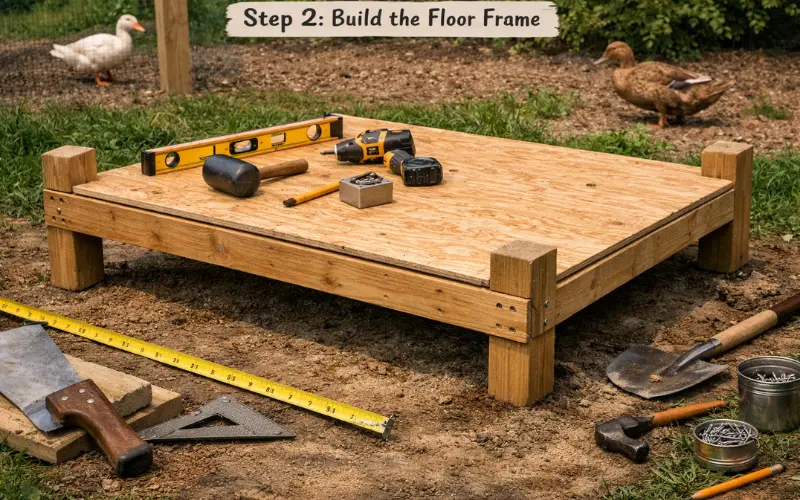
Assemble a 2×4 rectangular frame with cross joists every 16 inches. Attach a plywood or OSB sheet on top. If building elevated, attach 4×4 corner legs at this stage.
This floor is the foundation of your entire DIY duck house — make it level and solid. Ducks are heavy, and a wobbly floor will stress joints and gaps open over time.
Step 3: Frame and Raise the Walls
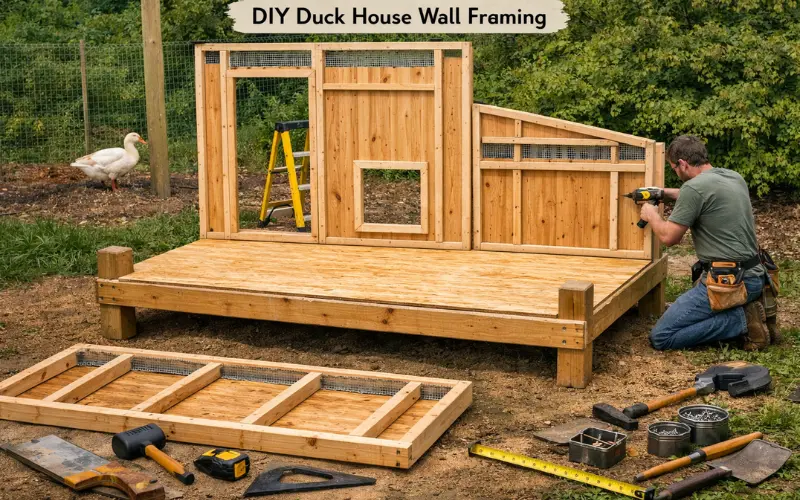
Build each wall flat on the ground, then stand them up and screw them into the floor frame. The front wall (where your access door goes) should be the tallest. The rear wall is shorter, creating your roof pitch.
Leave openings for:
- The human access door — as large as practical
- The duck door — minimum 12×14 inches (14×16 for Pekins or Muscovies)
- Ventilation gaps along the top of each wall, covered with hardware cloth
Step 4: Ventilate Your Duck House Properly
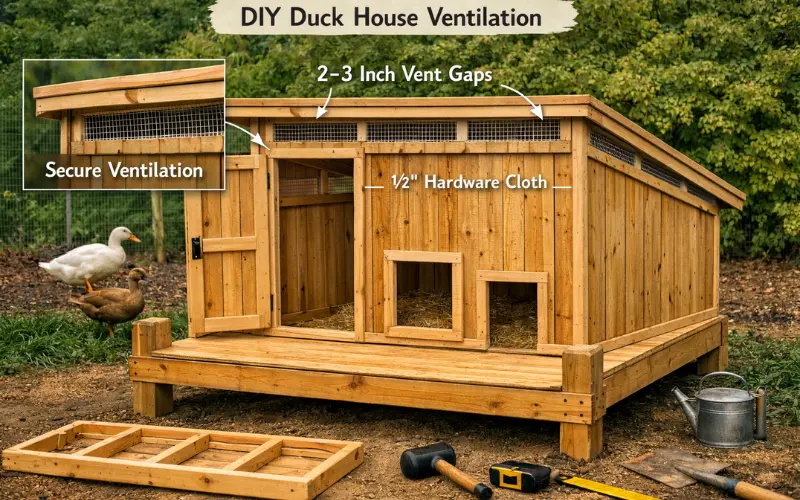
Ventilation is the most overlooked part of any DIY duck house build, and getting it wrong causes real problems. Ducks exhale significant moisture overnight, and without airflow, the interior grows mold and ammonia builds up fast.
Target 1 square foot of ventilation for every 10 square feet of floor space. Leave a 2 to 3 inch gap along the top of each wall, under the roof overhang. Cover every gap with 1/2-inch welded hardware cloth. This airflow setup keeps your duck house dry in summer and prevents dangerous ammonia buildup in winter.
Step 5: Attach the Roof
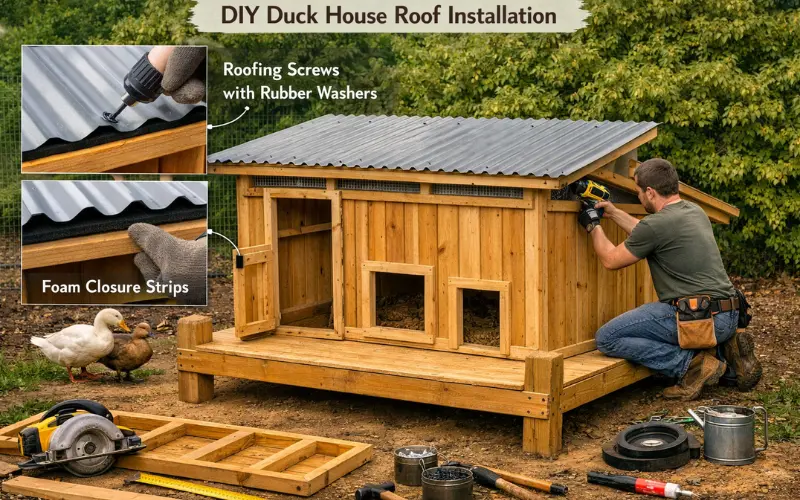
A single-pitch shed roof is the easiest roofing solution for a DIY duck house. Cut rafters to overhang the walls by 6 inches on all sides to direct rain away from your ventilation gaps and walls.
Attach corrugated metal or polycarbonate panels using roofing screws with rubber washers. Add foam closure strips along the bottom edge where corrugations meet the wall top — this blocks gaps that rats and mice use to enter.
Step 6: Install Doors and Access Panels
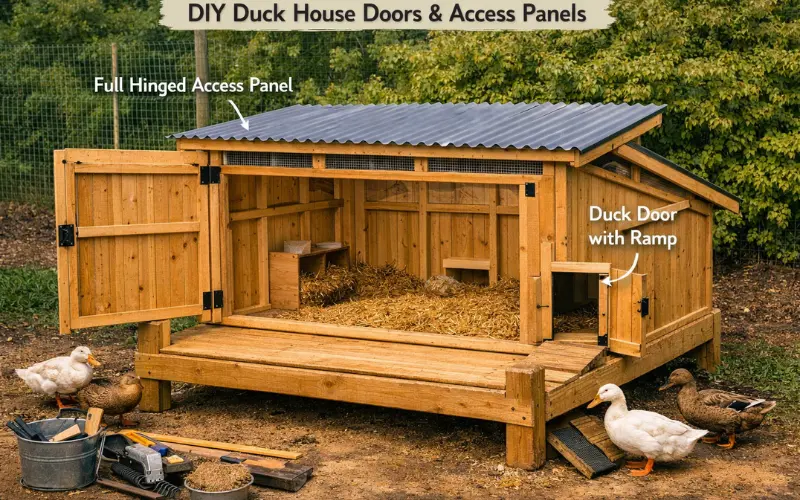
Your DIY duck house needs two doors: one for the ducks, one for you.
The duck door should sit at ground level or at the base of a gentle ramp. Hang it on exterior hinges so it opens outward, or rig it as a pulley-operated drop door you can open from outside the run.
Your human access door should be as wide as possible. Many experienced duck keepers build a full hinged wall panel that opens completely — it looks unusual but makes cleaning a 5-minute job instead of a 30-minute one. A duck house you can’t easily clean will never get cleaned properly.
Step 7: Add Vinyl Flooring
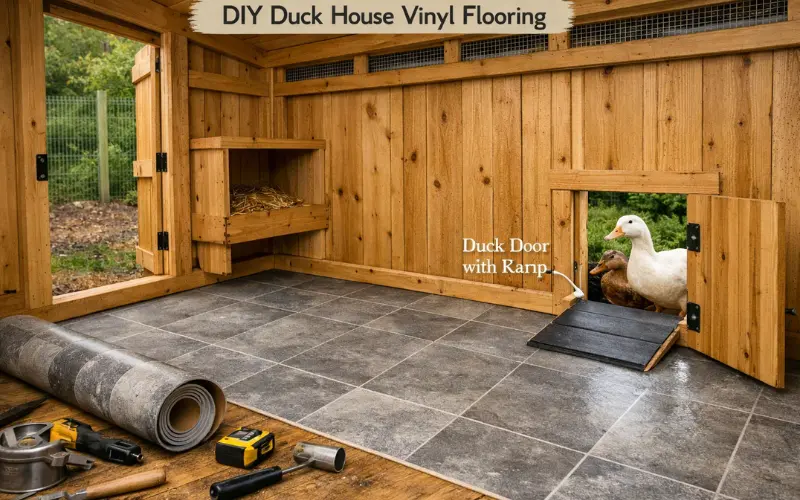
Once framing is done, lay peel-and-stick vinyl floor tiles across your plywood base. This single step makes your DIY duck house dramatically easier to maintain. Vinyl is waterproof, scrub-able, and replaceable if damaged. Duck droppings wipe off cleanly. The floor can be hosed out during deep cleans.
Never leave bare wood as your floor surface. Untreated plywood absorbs duck waste and moisture, grows bacteria, and breaks down within one season. Vinyl is a non-negotiable upgrade in any duck house DIY build.
Step 8: Predator-Proof Your Duck House
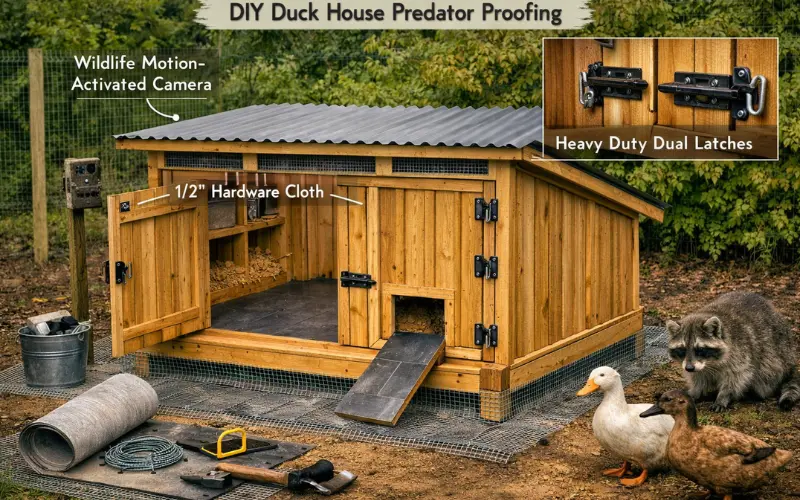
Predator-proofing separates a good DIY duck house from one that fails at the worst moment.
- Hardware cloth: Use 1/2-inch welded hardware cloth on every vent and opening. Standard chicken wire gaps wide enough for juvenile rats and weasels to enter, and rusts through within 2 to 3 years.
- Apron barrier: Attach a 12-inch apron of hardware cloth flat around the outside perimeter of your duck house and stake it down. This stops foxes, badgers, and dogs from digging under the walls.
- Latches: Raccoons can open simple barrel bolts. Use a slide bolt with a carabiner clipped through the end, or a two-step latch. Install two latches per door — one at the top and one at the bottom.
Best Bedding for a DIY Duck House
Choosing the right bedding makes maintaining your DIY duck house much easier:
| Bedding | Absorbency | Change Frequency | Cost |
|---|---|---|---|
| Straw | Poor | Weekly | Low |
| Pine shavings | Good | Weekly | Low |
| Pine pellets | Excellent | Every 1–2 weeks | Medium |
| Hemp bedding | Excellent | Every 2–3 weeks | Higher |
Pine pellets are the best value choice for most duck house setups. They expand into sawdust when wet, absorb heavily, and last significantly longer than straw or loose shavings between changes.
Common DIY Duck House Mistakes to Avoid
- Building too small. Four square feet per duck is the bare minimum. A cramped duck house means stressed birds, aggressive behavior, and faster bedding contamination.
- Skipping the vinyl floor. Bare plywood in a DIY duck house won’t survive a full season of duck traffic and moisture.
- Using chicken wire. It rusts and gaps. Always use 1/2-inch welded hardware cloth on your duck house.
- Keeping water inside. Ducks splash constantly. Water inside your duck house turns bedding into a swamp overnight. Move feeders and waterers outside.
- No apron barrier. Most duck losses happen to digging predators. A hardware cloth apron around your DIY duck house base costs almost nothing and takes 20 minutes to install.
- Poor ventilation. A sealed duck house builds ammonia and moisture fast. Always ventilate along the top of the walls, under the roof overhang.
FAQs About DIY Duck Houses
How much does a DIY duck house cost?
A basic DIY duck house built from pallets and reclaimed timber costs $20 to $50. A new lumber build runs $100 to $200. Premium builds with auto doors and treated lumber can reach $300 to $500.
What wood is best for a DIY duck house?
Untreated pine or spruce for framing, with a vinyl or linoleum floor surface. Avoid pressure-treated lumber inside your duck house — the chemicals can be harmful to ducks in an enclosed space.
Do ducks need a light in their house?
No. Ducks don’t need supplemental lighting in their duck house the way laying hens sometimes do. They’re hardy birds that adapt naturally to seasonal light changes.
How do I keep a duck house dry?
Good ventilation, a vinyl floor, bedding changed weekly, and keeping water outside the duck house are the four things that make the biggest difference.
Can I use a dog kennel as a duck house?
A solid-floor dog kennel can work as a temporary duck house if you add hardware cloth to all open panels and secure the latches properly. Long-term, a purpose-built DIY duck house with vinyl flooring and proper ventilation will serve your flock far better.
Final Thoughts
A well-built duck house doesn’t need to be expensive or complicated. Pallets, reclaimed timber, and offcut vinyl flooring can get you a solid structure for under $50. What matters more than materials is the design: enough space, real ventilation, a cleanable floor, hardware cloth on every gap, and latches a raccoon can’t figure out.
Build it right the first time and you’ll spend five minutes a day maintaining it instead of repairing it every season.