
A ledge in shower design is a half-height wall built across a shower, usually sitting between 1000mm and 1300mm off the floor. It gives you a flat, open surface for shampoo and soap without cutting into the wall cavity, and it works as a footrest, a shelf, and a design feature all at once. If you’re renovating a bathroom and trying to decide between a niche and a ledge, the ledge is worth a serious look.
I’ve fielded this question from more than one reader who assumed a shower ledge was just a smaller version of a bench seat. It isn’t. A bench is for sitting. A ledge is for storing and resting a foot while you shave your legs, and that distinction changes how you should plan it.
What Exactly Is a Shower Ledge?
A shower ledge is a stud-framed, waterproofed wall built to roughly half the height of your shower enclosure. Unlike a recessed niche, it doesn’t need to be carved into the existing wall cavity, so builders aren’t limited by standard timber stud depth. That means you can go as deep as your floor space allows, which is handy if you’re storing tall pump bottles or a razor and a full-size conditioner side by side.
Because it’s a genuine stud wall rather than a shelf, a ledge also does double duty. It can hide plumbing, act as a half-wall screen for an open shower, or separate the shower zone from the rest of a wet room bathroom without a full glass enclosure.
My take: most Australian bathrooms I’ve seen struggle with niches because the wall cavity is only 70mm to 90mm deep once you allow for waterproofing membrane and tile. A ledge sidesteps that limit entirely, which is why tilers increasingly recommend it for smaller renovations where a deep niche simply won’t fit.
Ledge vs Niche: The Practical Differences
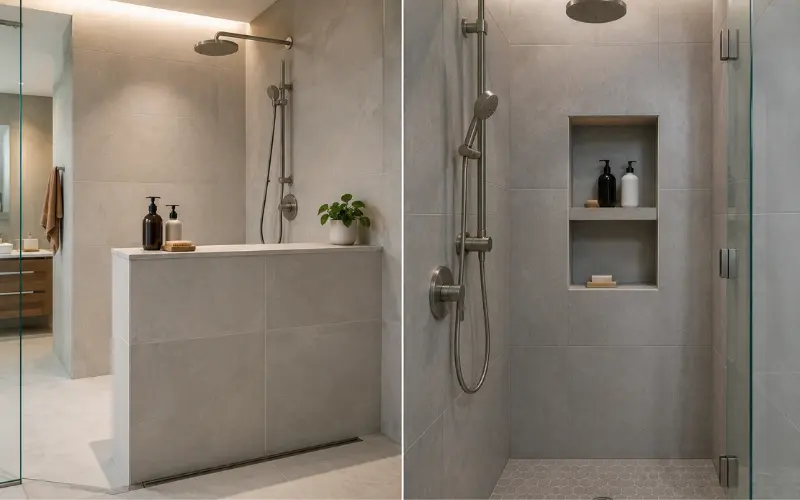
Most competitor guides stop at “a niche is recessed, a ledge sticks out.” That’s true, but it misses the two things that actually decide which one suits your bathroom: floor space and water management.
| Factor | Shower Ledge | Shower Niche |
|---|---|---|
| Typical height | 1000mm–1300mm from floor | 1200mm from floor (mid-height) |
| Typical depth | 90mm–200mm | 90mm (limited by wall cavity) |
| Floor space used | Yes, takes up some | None, sits flush |
| Best for | Larger bathrooms, footrest use, open showers | Small showers, minimalist walls |
| Waterproofing complexity | Moderate, needs a fall on the top surface | Higher, more corners to seal |
If your shower is compact, a niche keeps the footprint clear. If you’ve got the room, or you want a footrest and a divider in one, a ledge earns its keep.
Getting the Height and Depth Right
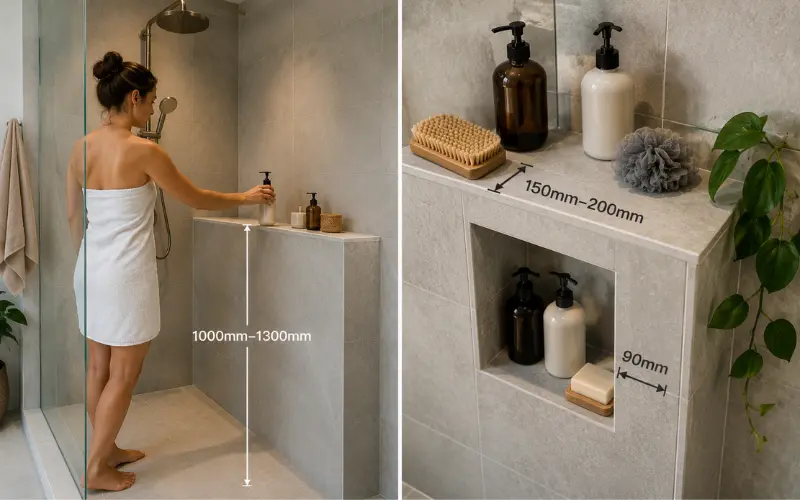
Standard advice lands on 1200mm as a comfortable reach height for most adults, but that number is a starting point, not a rule. Stand in your own shower and mimic reaching for a bottle before your tiler sets a single sheet. If you’re renovating for a household with a mix of heights, or planning ahead for kids who’ll use the same bathroom in a few years, split the difference and test it physically rather than trusting a generic figure.
Depth is where a ledge genuinely outperforms a niche. Because you’re not boxed in by a stud cavity, 150mm to 200mm is realistic, which comfortably fits pump bottles, a razor, and a loofah without anything toppling over every time the door is closed. This is one of the details most guides gloss over: a niche that’s only 90mm deep constantly has tall bottles falling forward, and nobody mentions it until you’re living with it.
The Slope Problem Nobody Talks About
Here’s the information gap in almost every article on this topic: a flat ledge is a mistake. Water pools on a level surface, and pooled water on grout leads to limescale, mould, and eventually cracked sealant. Your tiler should build in a fall of around 5mm to 6mm across the ledge, sloping back towards the shower drain, not towards the wall.
Ask your tiler directly whether they’re building in a fall before tiling starts. It’s far cheaper to fix on paper than to rip out tiles a year later because the ledge never dries properly.
Waterproofing and Building Compliance
A shower ledge is a wet area structure, which means it falls under AS 3740, the Australian Standard for waterproofing of domestic wet areas. Your builder needs to fully membrane the stud frame, not just the tile face, and the junction where the ledge meets the shower wall is the highest-risk point for leaks. This junction should get a waterproofing fillet or angle strip, the same way a shower base upstand does.
Skipping this step to save on labour is the single most common reason shower ledges fail early. If a tradesperson suggests skipping full waterproofing because “it’s above the shower base anyway,” that’s worth a second opinion.
Field note: on jobs where the ledge has failed within a few years, the cause is almost always the same, either no fall was built in or the internal corner wasn’t properly sealed before tiling. Both are invisible once the tiles go on, so it pays to ask for photos of the waterproofing stage before it’s covered.
Finishing the Edge: Mitred vs Capped
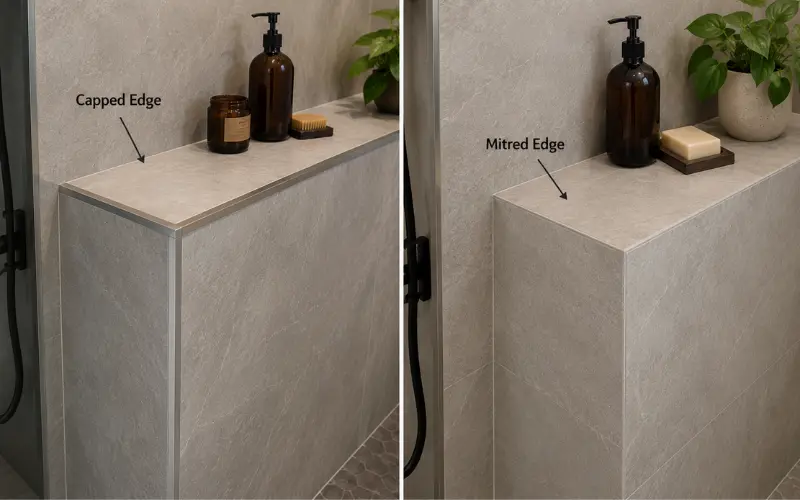
How you finish the exposed edge of the ledge changes the whole look. A capped edge uses an aluminium or PVC trim strip, which is the cheaper and faster option and works well if you want the trim colour to match your tapware. A mitred edge cuts the tiles at 45 degrees so two pieces meet at a clean right angle with no visible trim at all.
Mitred edges cost more in labour because they demand precision, but they read as a premium, seamless finish that photographs far better for a listing or a portfolio. If your budget allows it, this is the upgrade most worth spending on.
Retrofitting a Ledge Into an Existing Shower
Most guides only cover new-build showers, but plenty of readers are renovating an existing bathroom rather than starting from scratch. Retrofitting a ledge into an existing shower usually means:
- Removing the existing tiles down to the stud frame on at least one wall
- Confirming there’s enough floor space in front of the shower screen for the ledge to sit without blocking the door swing
- Re-waterproofing that entire section, not just patching around the new structure
- Matching new tile to existing tile, or accepting a deliberate contrast as a design feature
If your existing shower is genuinely tight, a half-depth ledge of around 100mm, or reverting to a niche instead, is usually the more realistic choice. This is a conversation worth having with your builder before you commit to a full retile.
Combining a Ledge With a Niche
You don’t have to choose one over the other. A growing number of Australian bathrooms use both: a ledge for footrest height and larger bottles, with a smaller niche built above it for razors, soap, or a candle. This hybrid approach gives you the storage flexibility of a ledge without losing the neat, recessed look of a niche entirely.
If you’re weighing up broader storage solutions for a small bathroom, it’s worth reading through some bathroom niche ideas before locking in a single approach, since the two features genuinely work better paired than either does alone.
What a Ledge Costs in an Australian Renovation
Cost varies a lot by region, tiler rates, and material choice, but a shower ledge typically adds a few hundred to over a thousand dollars to a renovation once you account for extra framing, waterproofing, and tiling labour, more if you’re using natural stone or requesting mitred edges throughout. If you’re working to a tight budget, a capped edge with standard ceramic tile keeps costs down while still giving you the storage benefit. For a fuller breakdown of where renovation dollars typically go, this guide to bathroom renovations on a budget is a useful companion read.
Design Ideas Worth Considering
- Run the ledge tile up the wall to blur the line between shower and bathroom, a look that suits open, modern Australian bathrooms with minimal visual breaks
- Use the ledge as a half-wall divider in an open shower or wet room bathroom where you want zoning without a full glass screen
- Pair it with a frameless shower screen to keep sightlines clean, since a bulky framed screen competes visually with a statement ledge
- Choose frosted glass for privacy on an adjoining screen if the ledge runs close to a window; comparing translucent glass vs frosted glass options first will save a reselection later
- Contrast the ledge tile against the wall tile to highlight it as a feature rather than let it disappear
Frequently Asked Questions on Ledge in Shower
What is the Ledge in Shower called?
It’s most commonly called a shower ledge, though you’ll also see it referred to as a half-wall, a nib wall, or a wall-to-wall shelf in trade circles.
What is a bathroom shower with a ledge?
It’s a shower where a half-height stud wall has been built into the enclosure to create a flat storage surface, rather than relying on a recessed niche or a hanging caddy.
Is a shower niche or Ledge in Shower better?
Neither is universally better. A niche suits small bathrooms where floor space is tight, while a ledge suits larger showers where you want more storage depth and a footrest.
What is the sill of a Ledge in Shower?
The sill usually refers to the base of a window opening or the threshold at the entry to a shower, which is a different feature from a ledge, though the two are sometimes confused in casual conversation.
How high should a Ledge in Shower be?
Most sit between 1000mm and 1300mm from the finished floor, with 1200mm being the most common starting point before adjusting for the household’s height.
How deep should a Ledge in Shower be?
Between 90mm and 200mm is typical, with the deeper end giving you far more flexibility for larger bottles.
Does a Ledge in Shower need waterproofing?
Yes, fully. It falls under the same wet area waterproofing standard as the rest of the shower, and the junction where it meets the wall needs particular attention.
Can I add a Ledge in Shower during a small renovation?
Yes, but it usually means retiling the affected wall from the stud frame up rather than tiling over the top of existing work, so factor that into your budget and timeline.

